Sunday 29 June 2014

Necklace fantastic crochet beads!


This simple crochet necklace , made with 100% cotton yarn , is the perfect complement to add a festive summer night look

I used a 4mm crochet hook

1] Chain 8
     in the chain 3 from the hook, make 5 doble crochet


2]To make the bead:
    join the 5 dc with a slip stitch to the 3 starting chain


Repeat   step 1 and 2 until you have the size you feel comfortable 


Tuesday 17 June 2014

Granny Square Magnificent


Fiber Flux is one of my favourites sites for crochet Inspiration


I love every post they make, how much effort they invest in each update , the quality of their chosen patterns and sites are always fantastic.

I have them on my list of favourites sites , not to miss any or their post !!!!

Todays one is just adorable... I can not resist to shared on my blog.


difficult to decide which one to do first
Thank you so much to Fiber Flux to share  this beauty.


Crochet Tunisian Simple Stitch


Tunisian crochet is a technique that really amaze me.

The possibilities and the results are so espectacular.

I definitely need to investigate some more and make a project with this stitch in the near future , maybe this summer holidays ????
Who knows

For now I will included in the Library collection


I- Cord Stitch

Very interesting Stitch simple and full of posibilities !!!


Crochet an i-cord (right-handed version)


https://www.youtube.com/user/planetjune
Crochet a I -CordCrochet an I-cord


Sunday 15 June 2014

Lace Cord of Long Stiches Bracelet

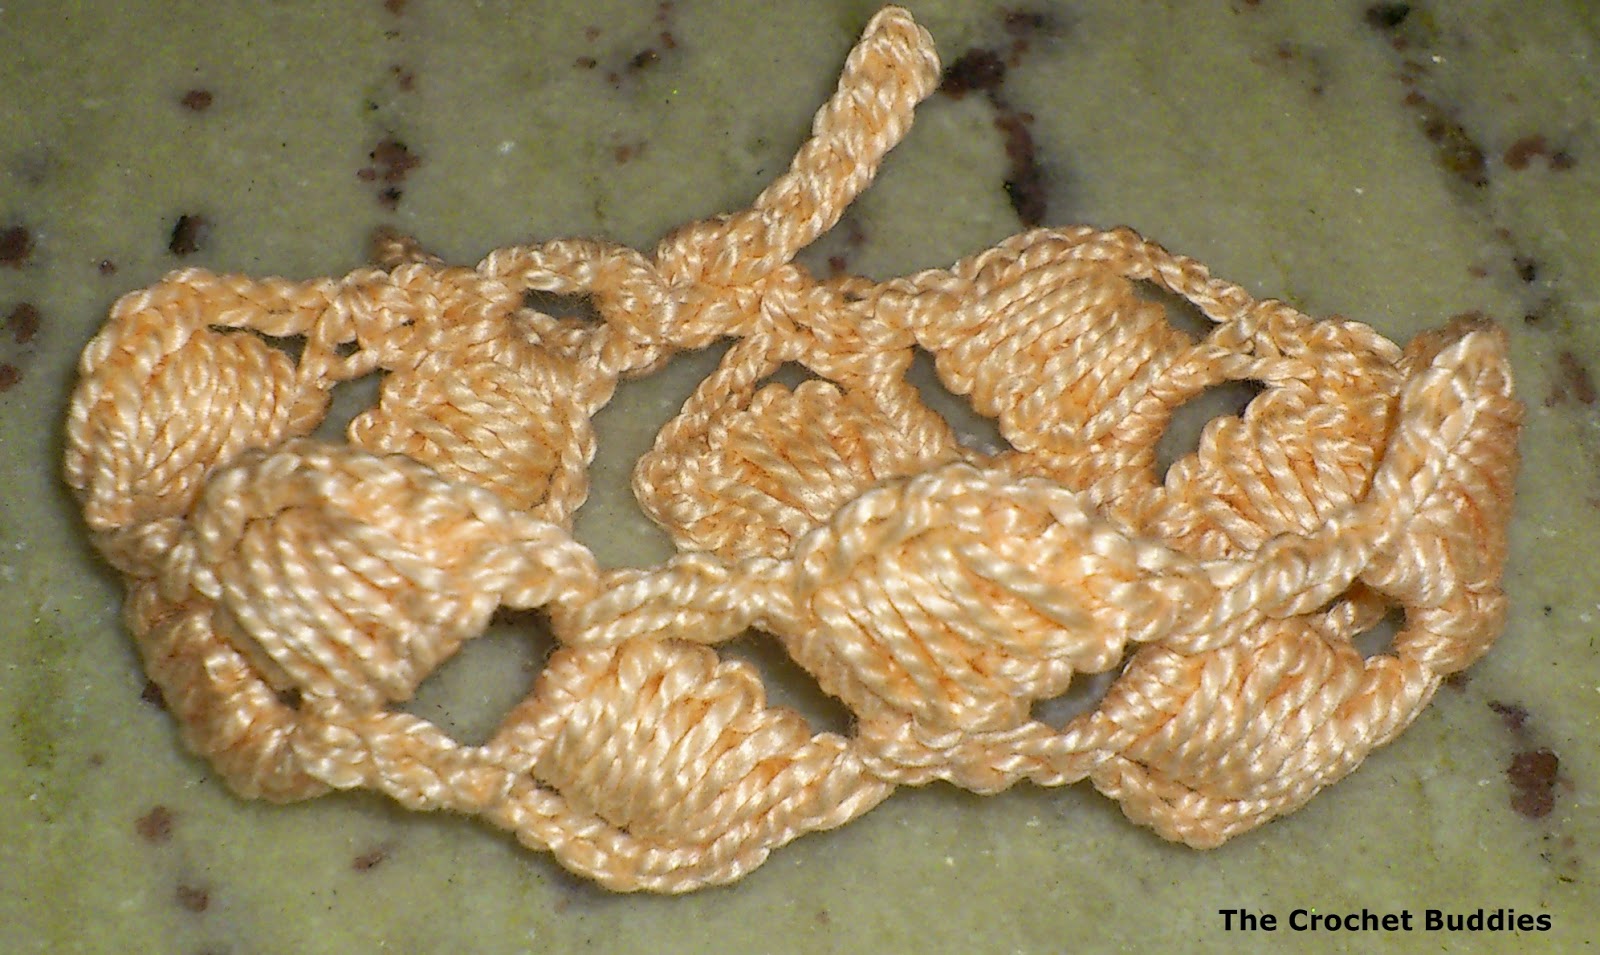
The Lace Cord of Long Stiches

A beautiful stitch to be used not just for bracelet but also for necklaces and belts.
We decided to try with a bracelet with this stich and some cotton yarn on a pale peach colour.

The tutorial from Sheruknitting was a fantastic help.


and our bracelet pictures !!!


Hope you like it as much as we did !!!

Flower Cruciani style bracelet


Discovering new techniques to make bracelets.

The initial idea was to make a project with flowers 

The weekend give us a little spare time to do this quick projects

The tutorial from Agulha Italiana was just what we were looking for


Some photos of the process and the final result. 


We also made today some other bracelets ,

I will add  information for the  pattern in another post.

I hope you like them 
I will appreciate if you  leave your comments.


Monday 9 June 2014

Zig-Zag Bracelet


The Zig Zag Bracelet is a perfet project for beginners .

following the tutorial from Sheruknittingcom
This cord is simple to make.

Just need to work single crochet stitches.


and here they are our Zig-Zag Bracelet
and the process of our work.


XXL Crochet Slippers


For quite some time I have not done anything with t-shirt yarn,

Last week I received some t-shirt yarn as a present , that made me feel  like making a project with this material.


I started improvising some slippers for my buddy, I have made the first on, but I was so excited that I did not write  the pattern !!!!
I like it , and I think she will like it too.
I will do the pair,  and this time,  I will write down the instructions


Sunday 8 June 2014

Start Stitch Coin Purse

I could not wait to try the Start Stitch , 
I posted the tutorial  in the new page I created in the blog call
 " Stitch Library "
I would like to keep a Library of all  the stitches that I really like. 

I have made a Coin Purse following the Parttern instructions.
Here are the pictures of the Purse , I found it so cute 


Wedge Stitch

Looking for a new stitch to shared in my Crochet Library blog,
I came across to a fantactic site call New Stitch a day, their tuturials are very clear , and easy to follow , as well as the written instructions.

I particulary love wedge stitch,-

Skill: Intermediate
Foundation Chain: Multiples of 6 sts + 1. Add 1 for base chain.


Chain Stitch – Ch
Single Crochet-sc
Double Crochet-dc
Slip Stitch- sl st
Half Double Crochet-hdc
Double Treble-dtr
Yarn Over-yo
Treble-tr
Wedge Picot (WP) – work 6ch, 1sc into 2nd ch from hook, 1 hdc into next ch, 1dc into next ch, 1tr into next ch, 1dtr into next ch
Pattern Instructions

Special Abbreviation: WP (Wedge Picot): work 6ch, 1sc into 2nd ch from hook, 1 hdc into next ch, 1dc into next ch, 1tr into next ch, 1dtr into next ch.
Row 1

(Wrong Side): 1sc into 2nd ch from hook, *1WP, skip 5ch, 1sc into next ch; rep from * to end, turn.
Row 2

5ch (count as 1dtr), *1sc into top of WP, over next 5ch at underside of WP work 1sc into next ch, 1hdc into next ch, 1dc into next ch, 1tr into next ch, 1dtr into next ch, skip next sc; rep from * omitting 1dtr at end of last rep when 2 sts remain, **[yo] 3 times, insert hook into last ch at underside of WP, yo, draw loop through, [yo, draw through 2 loops] 3 times, rep from ** into next sc, yo, draw through all 3 loops on hook, skip tch, turn.
Row 3

1ch, 1sc into first st, *1WP, skip next 5 sts, 1sc into next st; rep from * ending last rep with 1 sc into top of tch, turn.

Repeat rows 2 and 3 until you have reached your desired length.


Wednesday 4 June 2014

Star (Daisy) Stitch


The start stitch is particulary gorgeous


I found a great tutorial for this stitch on the bookpeopleestudio blog,star-daisy-stitch/ 


*******

I’m especially fond of Ishrat Khawja’s star stitch coin purse, which is offered as a free download on Ravelry.

The star stitch requires you to stick your hook into some nonstandard spaces, so I put together a little video tutorial to walk you through it. 
Everyone seems to do this stitch a little differently, so here’s my version. Written instructions appear below.


Multiple for the foundation chain is 2 (basically any even-numbered chain will do)

Row 1: Draw up a loop in the first ch (the one right next to your hook) and the next 4 ch for a total of 6 loops on your hook. YO and draw through all loops on hook to create a star. Ch 1 to secure the star. (Insert hook into the center of the star created by the ch-1 and draw up a loop. Draw up a loop by inserting your hook into the side of fifth loop you drew up in the previous star. Draw up a loop by inserting your hook into the foundation ch in the same ch space you used to draw up the fifth loop on the previous star. Draw up loops in the next two chs in foundation row. This gives you a total of 6 loops on your hook. YO and draw through all loops, and secure the star with a ch-1.) Repeat across till 1 ch remains. Dc in the last ch. Turn, ch 2.

Row 2: Make 2 hdc in the ch-1 spaces from the previous row. Do not hdc in the loop spaces that form the top of the star, only the ch-1 spaces. Make final hdc in the top ch from the previous row. Turn, ch 3.

Row 3: Insert hook into first ch (the one right next to your hook) and draw up a loop; do the same in the next 2 chs and the following two hdc. YO and draw through 6 loops on hook. Ch 1 to secure the star. (Insert hook into the center of the star created by the ch-1 and draw up a loop. Draw up a loop by inserting your hook into the side of fifth loop you drew up in the previous star. Draw up a loop by inserting your hook into the same hdc you used to draw up the fifth loop on the previous star. Draw up loops in the next two hdcs. This gives you a total of 6 loops on your hook. YO and draw through all loops, and secure the star with a ch-1.) Repeat across till 1 hdc remains. Dc in last hdc. Turn, ch 2.

Repeat rows 2 and 3.

The easiest Crochet Butterfly


We have been recently posting some crochet butterfly tutorials that we have found on the net,

This one is probably the easiest one,


Monday 2 June 2014

Crochet Hearts


This hearts are so cute and easy to make.

Found the hearts in a blog that I follow  Dada´s place
The pattern is originally form  Jose blog, is a great tutorial!

this are my hearts so far... I will be doing some more for sure !